OpenLiteSpeed 의 소개
1. 고성능 경량의 중심의 아키텍쳐
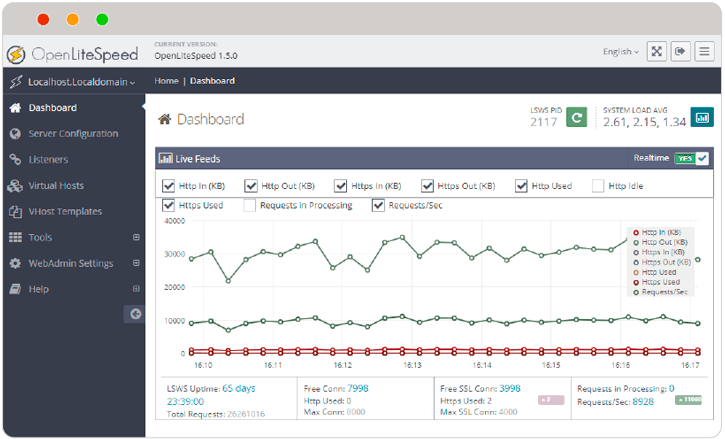
2. Webadmin 을 통한 GUI 관리 및 대쉬보드를 통한 실시간 현황 확인 가능
3. Apache 와 호환되는 mod_rewrite 엔진 사용
4. 페이지 압축을 통한 대역폭 감소(Gzip, Brotli)
5. HTTP/3, QUIC 및 All version of SPDY/2, 3, 3.1 and HTTP/2 support
6. TLS 1.0, 1.1, 1.2, 1.3 지원(with Boringssl)
1. OpenLiteSpeed 를 설치하기 위해서 먼저 CentOS(6, 7, 8), Ubuntu(16.04, 18.04, 20.04) OS 가 설치된 VM 혹은 전용장비를 준비합니다.
2. 먼저 시스템에 repo를 추가 하여 줍니다.
# CentOS 5
rpm -Uvh http://rpms.litespeedtech.com/centos/litespeed-repo-1.1-1.el5.noarch.rpm
# CentOS 6
rpm -Uvh http://rpms.litespeedtech.com/centos/litespeed-repo-1.1-1.el6.noarch.rpm
# CentOS 7
rpm -Uvh http://rpms.litespeedtech.com/centos/litespeed-repo-1.1-1.el7.noarch.rpm
# CentOS 8
rpm -Uvh http://rpms.litespeedtech.com/centos/litespeed-repo-1.1-1.el8.noarch.rpm
# Debian 7, 8 & Ubuntu 12,14,16,18,20.04
wget -O - http://rpms.litespeedtech.com/debian/enable_lst_debian_repo.sh | bash
3. 다음으로 OpenLiteSpeed 패키지를 설치합니다. 2020-10-05 일 기준으로 설치되는 버젼은 1.6.16 버젼입니다. (현재 추천) OpenLiteSpeed 기본 설치 경로는 /usr/local/lsws 입니다.
# CentOS
yum install openlitespeed
# Ubuntu
apt-get install openlitespeed
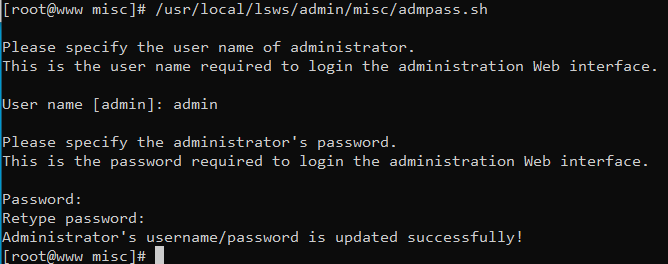
4. 다음으로 Webadmin 의 관리자 비밀번호를 설정합니다.
/usr/local/lsws/admin/misc/admpass.sh
5. Webadmin 및 http, https 를 위한 방화벽을 오픈합니다. 방화벽을 아예 끄시거나 아래와 같이 필요한 포트만 열어줍니다. 443(https)포트는 http/3 를 위하여 udp 포트도 오픈합니다. 7080 포트는 Webadmin 포트 입니다.
# CentOS 5, 6
iptables -A INPUT -p tcp –dport 80 -j ACCEPT
iptables -A INPUT -p tcp –dport 443 -j ACCEPT
iptables -A INPUT -p udp –dport 443 -j ACCEPT
iptables -A INPUT -p tcp –dport 7080 -j ACCEPT
iptables -A INPUT -p udp –dport 7080 -j ACCEPT
service iptables save
service iptables restart
# CentOS 7, 8
firewall-cmd --permanent --zone=public --add-service=http
firewall-cmd --permanent --zone=public --add-service=https
firewall-cmd --permanent --zone=public --add-port=443/udp
firewall-cmd --permanent --zone=public --add-port=7080/tcp
firewall-cmd --permanent --zone=public --add-port=7080/udp
firewall-cmd --reload
firewall-cmd --list-all
# Ubuntu - 만약 방화벽이 필요없고 꺼져있는 상태라면 안하셔도 됩니다.
apt install ufw
ufw allow 22,53,80,443,7080/tcp
ufw allow 443,7080/udp
ufw default reject
ufw enable
6. OpenLiteSpeed 웹서비스 포트가 기본적으로 8088포트로 설정이 되어 있습니다. Webadmin 을 접속하여 8088포트를 80포트로 변경하겠습니다.
https://$SERVER_IP:7080 으로 접속합니다. admin//위에서 설정한 패스워드로 로그인 합니다.

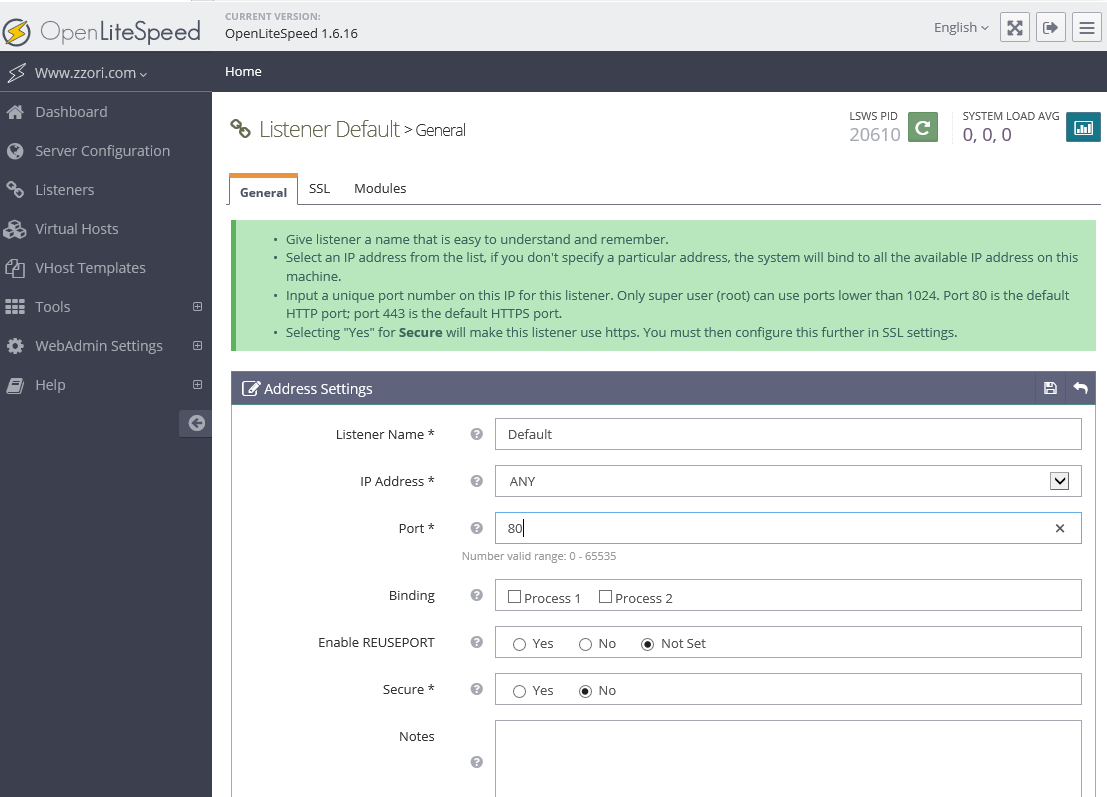
7. 메뉴에서 Listeners 에 들어가서 Default 리스너 Actions 에서 View 를 선택합니다. 그리고 Address Settings 오른쪽에 버튼(Edit)을 눌러서 Port : 8088 을 80으로 변경하고 저장(Save) 합니다.
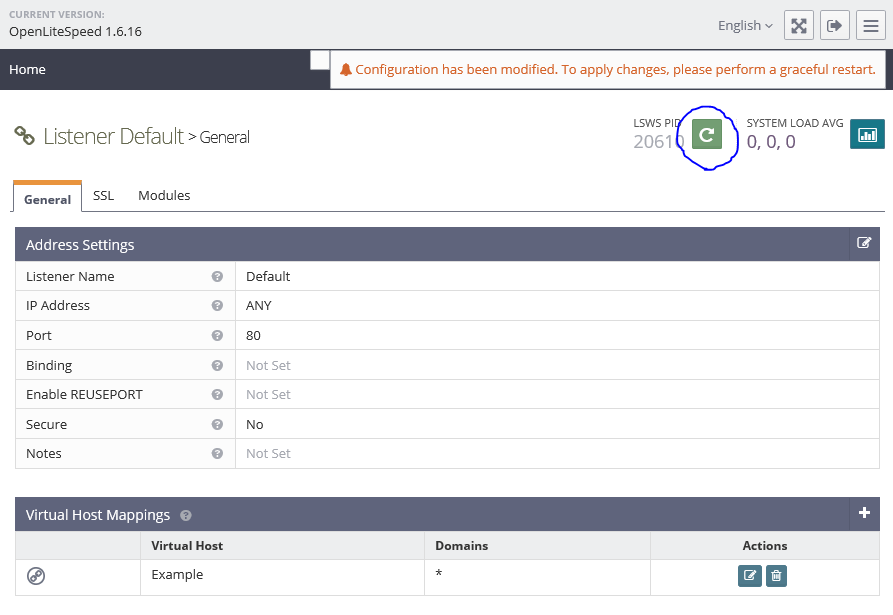
8. 변경한 내용을 적용하기 위하여 아래 이미지의 파란색으로 표시된 부분을 클릭하여 OpenLiteSpeed 서버를 재시작합니다.
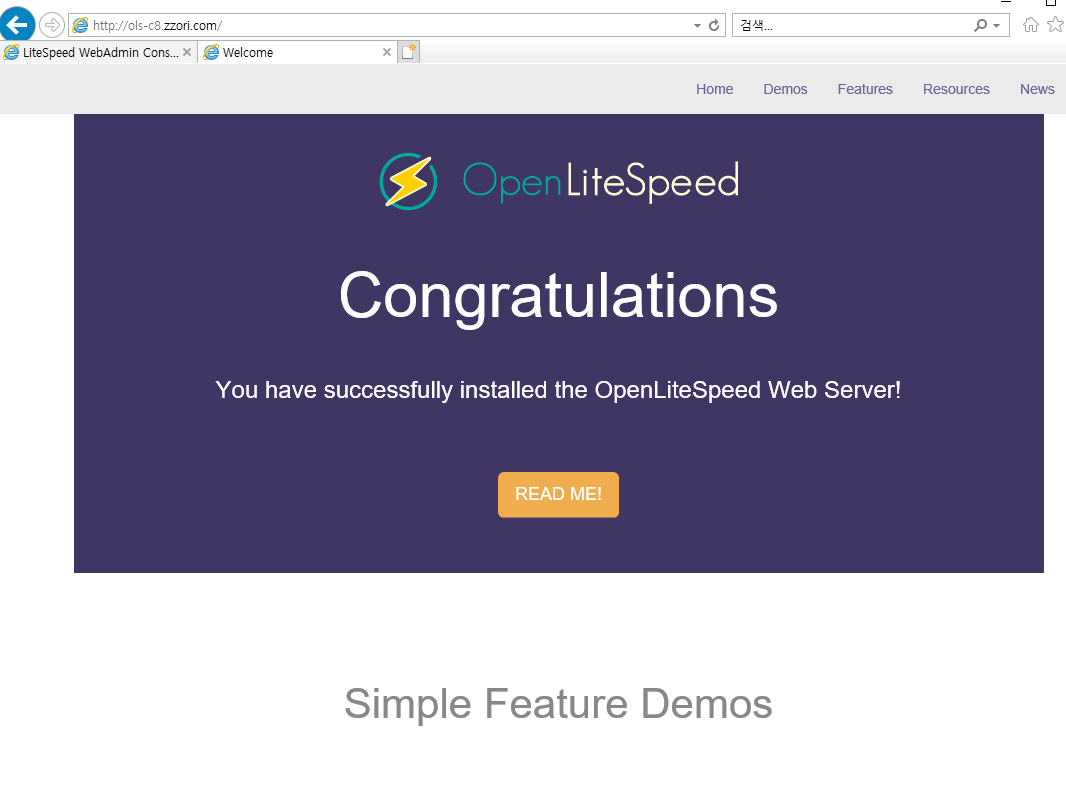
9. 이제 웹서비스 포트(80)로 바로 페이지 접속이 가능합니다.
http://SERVER_IP or http://도메인으로 접속하시면 아래와 같이 접속이 되는 것을 확인하실 수 있습니다.
여기까지 OpenLiteSpeed 설치는 완료입니다. 다음 글에서 virtualhost 설정 및 PHP설치에 관한 글을 작성하겠습니다.
댓글 0
| 번호 | 제목 | 글쓴이 | 날짜 | 조회 수 |
|---|---|---|---|---|
| 7 |
Apache 2.4.46 + PHP 8.0.3 + MariaDB 10.5.9 웹서버 설치하기(Mac Apple Silicon M1)
| 지혜바보 | 2021.03.21 | 8005 |
| 6 |
caddy 2.3.0 + PHP 8.0.3 + MariaDB 10.5.9 웹서버 설치하기(HTTP/3, 무료 SSL인증서 자동, Mac Apple Silicon M1)
| 지혜바보 | 2021.03.21 | 10583 |
| 5 |
[2021.02] caddy 2.3.0 + PHP 8.0.2 + MariaDB 10.5.8 웹서버 설치하기(HTTP/3, 무료 SSL인증서 자동)
| 지혜바보 | 2021.02.14 | 9014 |
| 4 |
CentOS 7.x 에서 웹서버(nginx+php-fpm+MYSQL) 구성하기 TLS v1.3 지원 및 SSL LABS A+
| 지혜바보 | 2021.01.31 | 8855 |
| 3 |
CentOS 6.x 에서 웹서버(nginx+php-fpm+MYSQL) 구성하기 TLS v1.3 지원 및 SSL LABS A+
| 지혜바보 | 2021.01.31 | 8385 |
| 2 |
OpenLiteSpeed PHP 7.3.22 to 7.4.10 으로 업그레이드 하기
| 지혜바보 | 2021.01.31 | 4135 |
| » |
OpenLiteSpeed 설치하기 (CentOS, Ubuntu)
| 지혜바보 | 2021.01.30 | 4860 |